The starter relay plays a crucial role in the starting process of a vehicle, as it controls the flow of electrical current to the starter. Understanding the location of the starter relay is essential for troubleshooting and maintenance purposes.
By knowing where to find it, you can easily inspect, test, or replace the relay if needed, ensuring the smooth operation of your 1999 Honda Civic.
Introduction
The starter relay plays a crucial role in the starting process of a vehicle, as it controls the flow of electrical current to the starter. Understanding the location of the starter relay is essential for troubleshooting and maintenance purposes.
By knowing where to find it, you can easily inspect, test, or replace the relay if needed, ensuring the smooth operation of your 1999 Honda Civic.
Understanding the Starter Relay
The starter relay acts as a switch that controls the electrical current flow from the battery to the starter motor. When you turn the ignition key, the relay receives a signal and activates the starter motor, allowing the engine to start.
1999 Honda Civic Starter Relay Location
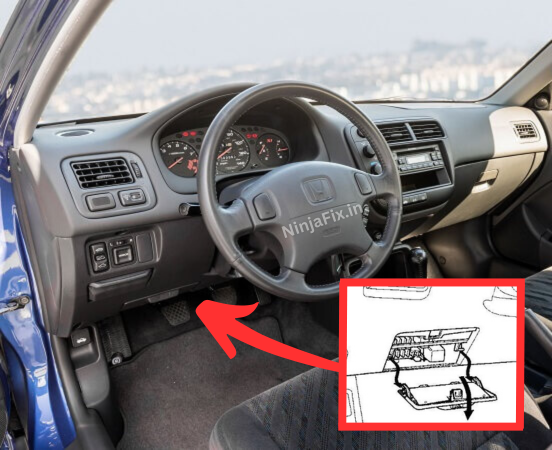
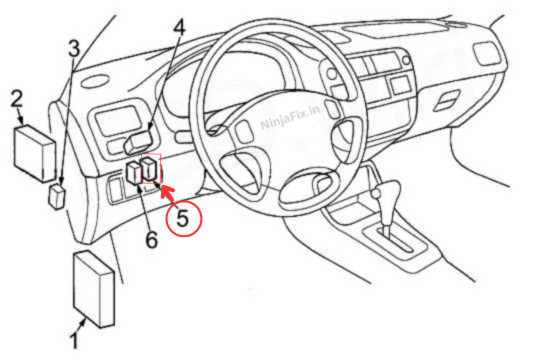
In the 1999 Honda Civic, the starter relay is located in the under-dash , which is situated beneath the left side dashboard of steering column. The under-dash fuse box is easily accessible by removing the panel cover located below the steering column.

Honda Civic 1999 Starter Relay Location

| Year | Relay Function | Relay No | Location | |
| 1999 | Starter Cut Relay | 5 | Under Dash | Check more about Honda Civic 1999 Fuse Box Diagram and Location. |
Common signs of a faulty starter relay
The symptoms of a bad starter relay can identify in various ways, including clicks, silence, intermittent starting, or continuous cranking. It’s crucial for car owners to recognize these symptoms promptly and take the necessary steps to diagnose and address the problem.
Related Video:
Read more about: Symptoms of Bad Starter Starter Relay: How To Fix It?
If necessary, you can follow these steps to replace or repair the starter relay:
1) Disconnect the battery to ensure safety,
2) Remove any necessary components obstructing access to the relay,
3) Disconnect the wiring harness and remove the old relay,
4) Install the new relay and reconnect the wiring harness,
5) Reassemble any components that were removed, and
6) Reconnect the battery and test the starting system.
Conclusion
In conclusion, understanding the location of the starter relay in your 1999 Honda Civic is crucial for effective troubleshooting and maintenance.
By following the outlined steps, you can easily locate the relay within the engine compartment. If you encounter starting issues, identifying and addressing any potential problems with the starter relay can help ensure the proper functioning of your vehicle.
WARNING: The terminal and harness assignments for individual connectors may vary depending on the vehicle’s equipment level, model, and market. It is recommended to refer to the fuse box diagram provided at the back of the fuse box cover for accurate information.


